FREE 30 Day DEMO
This application converts text files exported out of AutoCad into the proper format for importation into E.J.E.’s Structural Material Manager software.
The program consists of seven screens shown in Figures 1 through 7. A short description of each screen and its function in the program follows each figure.
Main Conversion Screen
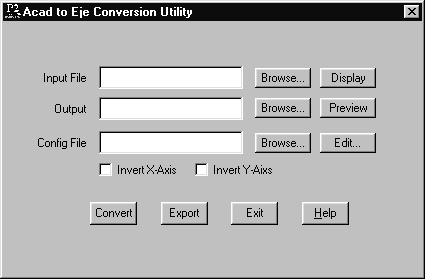
Figure 1 – Main Conversion Screen
The window shown in Figure 1 is what appears when the Ac2eje.exe application is executed. The window consists of three input fields and ten push button options.
Input File Field
The Input File field is the location of the source text file that was exported from AutoCad. This file is created within AutoCad by running the ORDBIL.LSP or the ATTRIB.LSP program. You can also specify a wildcard “*.orb” or even a wildcard with a path (“c:\ac2eje32\dwgs\*.orb”) in the input field to process more than one file.
Note: To process more than one file, you must have already created the configuration file for this set of drawings and the ORB files that you are wanting to process. You do this by calling up a single ORB file and then creating the configuration file to match its layout. After completing the process of creating the configuration file, you can then go back and enter a wildcard Input File name.
Loading LSP Programs in AutoCad
To load the LSP programs in AutoCad, click on the File menu bar option, go down and click on the Application menu bar option. If the ORDBIL or the ATTRIB LSP programs are not shown in the “Files to Load” window, select the File button and locate the appropriate LSP program to load. If the LSP programs are already listed in the “Files to Load” window, highlight the LSP program that you wish to use and select the Load button. Once the LSP program is loaded into memory, you type “ORDBIL” at the Command prompt in AutoCad to execute the program. The program will then ask you to window the bill of material (BOM). Be sure to select the column headers in the BOM. After all the entities in the BOM have been selected, press the Enter key to write the data to the ORB file. You must create one ORB file for each drawing that you are wanting to import into EJE.
Output Field
The Output field is the name of the text file that will be created after the conversion process has been completed. This is also the same file name that you will enter as the import file name in the E.J.E. External Data Interface module. If the output file already exist when you click on the Convert button, you will be prompted to Append, Overwrite or Cancel the conversion process.
Config File Field
The Config File is the name of the configuration file that will be used in converting the AutoCad data into the E.J.E. format. Multiple configuration files are needed when you have several vendors supplying you with AutoCad ORB files that contain different BOM structures. If you are processing several ORB files (*.orb), they must all conform to the same configuration file. To edit the configuration file, click on the Edit button.
Example: Vendor A’s bill of material contains five columns of data (quantity, material, piece mark, weight and minor piece mark) while Vendor B’s bill of material is in a different order (quantity, material, piece mark, minor piece mark and weight). In this case, you would create a different configuration file for each vendor to accommodate the different layouts of the bills.
Browse Push Buttons
These three Browse push buttons are used to locate the desired file and/or folders. When you click on the Browse button just to the right of the Input File field, you will see Figure 2 just below. Select the ORB file by highlighting the proper file and clicking on the open button. The Browse buttons work the same for the other two fields (Output and Config File) except you should locate the file appropriate to the field being filled with the information that you seeking.
Open File Window
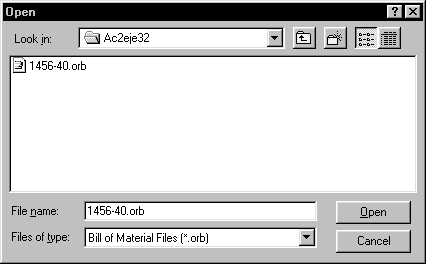
Figure 2 – Open File Dialog
The Display push button will open a window, shown in Figure 3, that contains the information that is found in the current Input File field. If the information appears upside down or backwards from left to right, use the Invert X-Axis or Invert Y-Axis check boxes to change how the input file is displayed in this window.
Display Orb Window
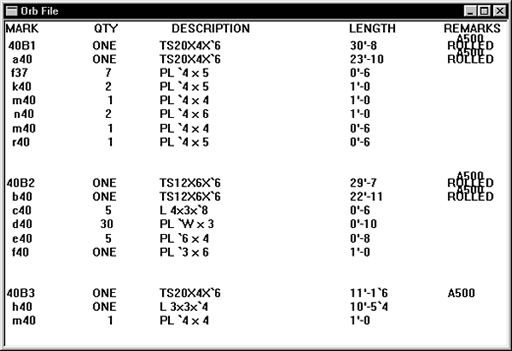
Figure 3 – Display Button
The Preview push button will open a window, shown in Figure 4, which contains the information that will be written to the Output file. This option is only available if the Config File field contains a configuration file name and the Input File field contains an ORB file name.
Preview Button Window
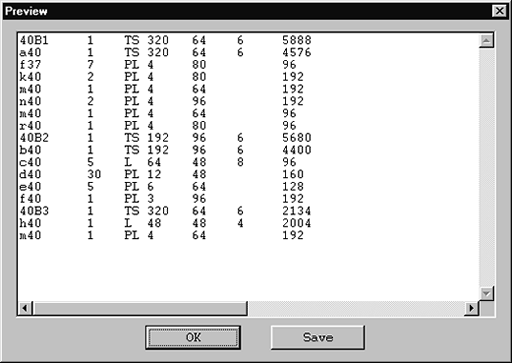
Figure 4 – Preview
The Convert push button will start the conversion process and when complete, will present a message stating that it is complete. This is the push button you would use to convert the data into an E.J.E. compatible format. An example ORB and its converted output is shown below.
| ORB File
(274.25 184.25 0.0),30′-8
(274.167 187.258 0.0),LENGTH
(274.25 179.25 0.0),0′-6
(274.25 176.75 0.0),1′-0
(274.25 174.25 0.0),1′-0
(274.25 181.75 0.0),23′-10
(274.25 171.75 0.0),1′-0
(274.25 166.75 0.0),0′-6
(274.25 169.25 0.0),0′-6
(274.25 159.25 0.0),29′-7
(274.25 156.75 0.0),22′-11
(253.75 187.258 0.0),QTY
(253.667 184.25 0.0),ONE
(254.667 179.25 0.0),7
(254.667 176.75 0.0),2
(254.833 174.25 0.0),1
(253.667 181.75 0.0),ONE
(246.667 187.258 0.0),MARK
(246.917 184.25 0.0),40B1
(247.167 179.25 0.0),f37
(247.25 181.75 0.0),a40
(247.25 176.75 0.0),k40
(247.25 174.25 0.0),m40
(254.667 171.75 0.0),2
(254.833 166.75 0.0),1
(254.833 169.25 0.0),1
(253.667 156.75 0.0),ONE
(253.667 159.25 0.0),ONE
(247.333 171.75 0.0),n40
(247.25 156.75 0.0),b40
(246.75 159.25 0.0),40B2
(247.25 169.25 0.0),m40
(247.25 166.75 0.0),r40
(260.0 187.258 0.0),DESCRIPTION
(259.0 179.25 0.0),PL `4 x 5
(259.0 176.75 0.0),PL `4 x 5
(259.0 174.25 0.0),PL `4 x 4
(259.0 169.25 0.0),PL `4 x 4
(259.0 171.75 0.0),PL `4 x 6
(259.0 166.75 0.0),PL `4 x 5
(259.0 184.25 0.0),TS20X4X`6 |
ORB File (cont.)
(259.0 181.75 0.0),TS20X4X`6
(259.0 159.25 0.0),TS12X6X`6
(259.0 156.75 0.0),TS12X6X`6
(281.75 187.258 0.0),REMARKS
(282.0 184.25 0.0),ROLLED
(282.75 185.5 0.0),A500
(282.75 183.0 0.0),A500
(282.0 181.75 0.0),ROLLED
(282.0 156.75 0.0),ROLLED
(282.75 158.0 0.0),A500
(282.75 160.5 0.0),A500
(282.0 159.25 0.0),ROLLED
(274.25 154.25 0.0),0′-6
(274.25 149.25 0.0),0′-8
(274.25 151.75 0.0),0′-10
(274.25 146.75 0.0),1′-0
(274.25 139.25 0.0),11′-1`6
(274.25 136.75 0.0),10′-5`4
(274.25 134.25 0.0),1′-0
(254.667 154.25 0.0),5
(254.667 149.25 0.0),5
(254.25 151.75 0.0),30
(253.667 146.75 0.0),ONE
(253.667 139.25 0.0),ONE
(247.25 154.25 0.0),c40
(247.25 151.75 0.0),d40
(247.25 149.25 0.0),e40
(247.25 146.75 0.0),f40
(246.75 139.25 0.0),40B3
(254.833 134.25 0.0),1
(253.667 136.75 0.0),ONE
(247.25 136.75 0.0),h40
(247.25 134.25 0.0),m40
(259.0 154.25 0.0),L 4x3x`8
(259.0 151.75 0.0),PL `W x 3
(259.0 149.25 0.0),PL `6 x 4
(259.0 146.75 0.0),PL `3 x 6
(259.0 136.75 0.0),L 3x3x`4
(259.0 134.25 0.0),PL `4 x 4
(259.0 139.25 0.0),TS20X4X`6
(282.083 139.25 0.0),A500 |
Converted Output
40B1 1 TS 320 64 6 5888
a40 1 TS 320 64 6 4576
f37 7 PL 4 80 96
k40 2 PL 4 80 192
m40 1 PL 4 64 192
n40 2 PL 4 96 192
m40 1 PL 4 64 96
r40 1 PL 4 80 96
40B2 1 TS 192 96 6 5680
b40 1 TS 192 96 6 4400
c40 5 L 64 48 8 96
d40 30 PL 12 48 160
e40 5 PL 6 64 128
f40 1 PL 3 96 192
40B3 1 TS 320 64 6 2134
h40 1 L 48 48 4 2004
m40 1 PL 4 64 192 |
The Export Text push button will export the data in a delimited format using the tilde ‘~’ as a delimiter between the columns. During the export process, all the fractions and material types will be converted into their proper format from the information found in Figure 7 and Figure 6, respectively. An example of an exported file is shown below.
| Export File Example
40B1~1~TS20X4X 3/8~30′-8~ROLLED
~~~~A500
a40~1~TS20X4X 3/8~23′-10~ROLLED
f37~7~PL 1/4 x 5~0′-6~
k40~2~PL 1/4 x 5~1′-0~
m40~1~PL 1/4 x 4~1′-0~
n40~2~PL 1/4 x 6~1′-0~
m40~1~PL 1/4 x 4~0′-6~
r40~1~PL 1/4 x 5~0′-6~
~~~~A500 |
Export File Example (cont.)
40B2~1~TS12X6X 3/8~29′-7~ROLLED
~~~~A500
b40~1~TS12X6X 3/8~22′-11~ROLLED
c40~5~L 4X3X 1/2~0′-6~
d40~30~PL 3/4 x 3~0′-10~
e40~5~PL 3/8 x 4~0′-8~
f40~1~PL 3/16 x 6~1′-0~
40B3~1~TS20X4X 3/8~11′-1 3/8~A500
h40~1~L 3X3X 1/4~10′-5 1/4~
m40~1~PL 1/4 x 4~1′-0~ |
Exit Push Button
The Exit push button will exit the program.
Invert X-Axis & Invert Y-Axis Check Boxes
These two check boxes are used to flip the x-axis and/or y-axis when you click on the Display push button. An example of this window is found in Figure 3.
Edit Push Button
The Edit push button will take you to the Column, Material and Fractions configuration window. This is where you would specify the columns and type of data being converted. For a detailed description of these windows, see the next several sections of this manual.
Columns Configuration
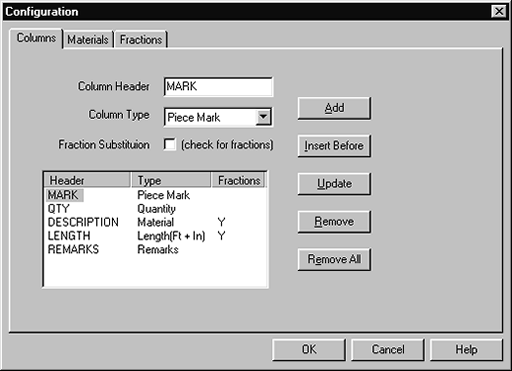
Figure 5 – Column Configuration
The Column Header field is where you would type in the text that appears at the top of a column on your bill of material. For example: If the top of your materials column on your BOM is “DESCRIPTION”, you would enter this word into the Column Header field. Note: The Column Headers have to be unique and in the order as they are shown on the BOM from left to right. Column headers on the left side of the BOM should be at the top of the list with the ones on the right being at the bottom. For stacked column headers (i.e. “Ship Mark” with Ship on one line and Mark underneath), you can use either word in the Column Header field.
Column Type List
The Column Type list is used to identify the type of data that this column on the BOM contains. For example, the column that contains the description of the materials (W12x40, etc.) would be identified as “Material”.
Most of the types are self explanatory except for the types representing piece marks. There are three types of piece marks, Major PC Mark, Minor PC Mark and Piece Mark. If you identify a column as a “Major PC Mark”, regardless of the case (upper or lower) of the piece marks in this column, all of the piece marks will be converted to upper case. This is just the opposite for “Minor PC Mark”. All of the piece marks will be converted to lower case characters if the column is identified as “Minor PC Mark”. If you use the type “Piece Mark”, the system will not convert the case of the piece marks in this column. If you used a combination of upper and lower case characters in this column, they will remain the way that you entered them on the BOM.
Fraction Substitution Check Box
The Fraction Substitution check box is used to identify columns of data on the BOM that use fractional substitution characters. If this column of data uses fractions substitution (i.e. a = 1/16, b=1/8, etc), click on the box next to the Fraction Substitution text. Be sure to confirm that the codes used for fractions match the codes in the Input File. You can check the fraction character set by clicking on the Fractions tab at the top of the Configuration window. See Figure 7 for more information on the Fractions window.
Add Push Button
The Add push button is used to add the information in the Column Header, Column Type and Fractional Substitution fields to the list of identified columns on the bill of material. The information will be added to the end of the current list.
Insert Before Push Button
The Insert Before push button is used to add the information in the Column Header, Column Type and Fractional Substitution fields to the list of identified columns before the current location of the cursor in the list of identified columns on the bill of material.
Update Push Button
The Update push button is used to update the current selected line in the list with the information in the Column Header, Column Type and Fractional Substitution fields.
Remove Push Button
The Remove push button is used to remove the currently selected line in the list of column types.
Remove All Push Button
The Remove All push button is used to remove all of the identified column types from the list of column types.
Material Configuration
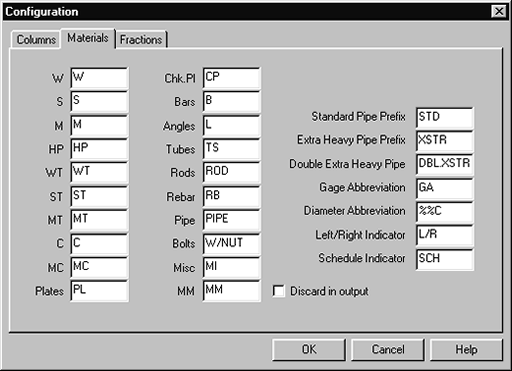
Figure 6 – Material Configuration
The Materials window, shown in Figure 6, is used to identify all the material type codes found on the bill of material to the conversion utility. The material codes that E.J.E. expects to see upon import are shown to the left of the input fields. The codes that are being used on your BOM should be keyed into the fields beside the E.J.E. codes. When you click on the Convert or Export button on the Main window, the utility will convert the codes in the input fields to their corresponding E.J.E. code during the conversion process.
You can enter characters from the extended ASCII character set by holding down the ALT key on your keyboard and keying in the four digit numerical code that represents the character (you must use the numerical keypad for this operation) that is in your bill of material. If the code is only three characters long, proceed the number with a zero.
Fractional Substitution Configuration
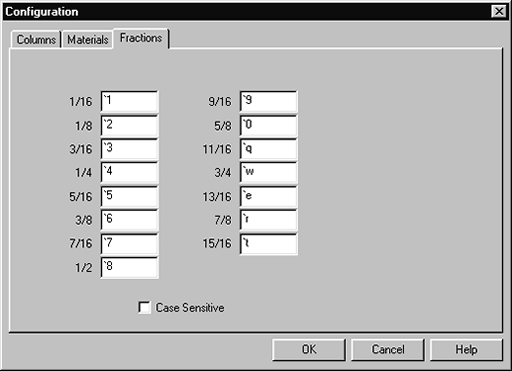
Figure 7 – Fractions Configuration
The Fractions window, show in Figure 7, is used to identify the characters that represent fractions in the Input File. This window determines the relationship between the characters in the Input File and how you want them represented in a numerical fashion after you click on the Convert or Export buttons on the Main window. If you click on the Case Sensitive box, this will make the test of the substitution characters case sensitive. For example, if the Case Sensitive box has been check, a lower case letter “a” is not the same as an upper case letter “A”. If the Case Sensitive box is not checked, a lower case letter “a” is the same as an upper case letter “A”.
You can enter characters from the extended ASCII character set by holding down the ALT key on your keyboard and keying in the four digit numerical code that represents the character (you must use the numerical keypad for this operation) that is in your bill of material. If the code is only three characters long, proceed the number with a zero.
Rules for your Bill of Material
- You must select the column headers in the BOM (Qty, Description, Weight, etc.) when you run the LSP program in AutoCad.
- The column headers must have the same alignment (left, right or centered) as the data in the column.
- If the information in the BOM is plain text, the column headers must be plain text of if the information is in attributed blocks, the column headers must be attributed blocks.
- If you use a code to represent a given item (i.e. B for bar), all the drawings processed must use the same code or you will be forced to create a new configuration file for those drawings where you started using a different code (i.e. BAR for bar versus B for bar). You cannot have multiple codes for material types or fractions within a given configuration file.
- For stacked column headers (i.e. “Ship Mark” with Ship on one line and Mark underneath), you need to make sure that one of the two column headers is unique to this column. When you identify the column headers on the Columns window, you must use a unique word to identify the column.