FREE 30 Day DEMO This application captures bill of materials (BOM’s) set up on a specific layer in AutoCAD 14 through the latest version of AutoCAD. This application is designed to be used in conjunction with two other products from P2 Programs – the AutoCAD to EJE and the AutoCAD to KISS conversion utilities. This application will only work for drawings that have their BOM’s located on a specific layer and this is the only information that resides on that layer.
The application consists of six screens shown in Figures 1-6. A short description of each screen and its function in the program follows each figure.
Registration Window
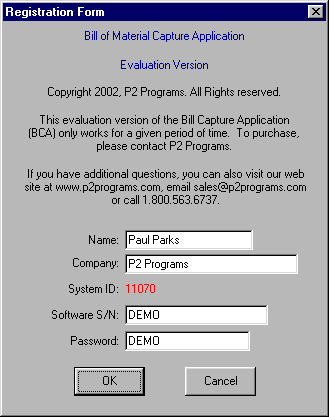
Figure 1 – Registration Window
When you start the application for the first time, the Registration Form will appear. If you are running this application in the “Demo” mode, enter your Name and Company Name in the fields provided. Enter the word DEMO in both the Serial Number and Password fields. This will allow the application to run in a Demo mode for up to 15 days.
If you have purchased the package, P2 Programs will issue you a Serial Number and Password. After registration, only a Splash screen will appear when you start the application.
Main Application Window
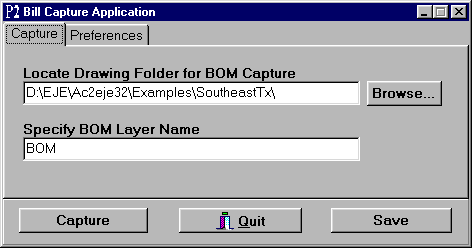
Figure 2 – Capture Application, Capture Tab
This is the main window in the application. It consists of two tabs – the Capture and Preferences (see Figure 4 on page 4). On the Capture tab, you have two input fields with four push buttons. Each of the input fields and the push buttons are described below.
Input Field Descriptions
Locate Drawing Folder for BOM Capture
This input field is where you would specify the folder location of the drawings that you wish to capture their BOM’s. At the end of the capture process, one “ORB” file will exist for each drawing in the specified folder. To locate the folder, use the Browse button to the right of this input field as shown in Figure 3.
Specify BOM Layer Name
As stated at the top of page one, the bill of material must be on its own layer. We suggest using a layer name like BOM or BILL. The layer that you specify must only contain the BOM and nothing else. The lines of the BOM can be on this layer but no other text information may reside on this layer. In any case, you must specify the layer name in this field. When the drawing is opened by this application, it will capture all the information on the layer specified in this field and create an ORB file from that information.
Push Button Descriptions
Browse
This button is used to locate the folder of the drawings that you wish to capture and create ORB files. The window that appears is shown in Figure 3. Use this window to drill down to the folder that contains the drawings you wish to capture. Once the folder is found, click on the OK button to return to the main window.
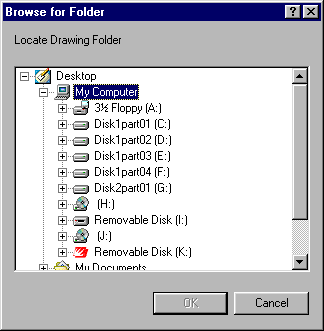
Figure 3 – Capture Tab, Browse Button
Capture
Once you have provided all the required information on both the Capture and Preferences tabs, this button is used to start the capture process and will create one ORB file for each drawing in the specified folder.
Quit
This button is used to quit the application. The settings on both tab windows will not be saved when exiting the application unless you have clicked on the Save button prior to exiting the application.
Save
This button will save all the settings and preferences on both tabs in the application.
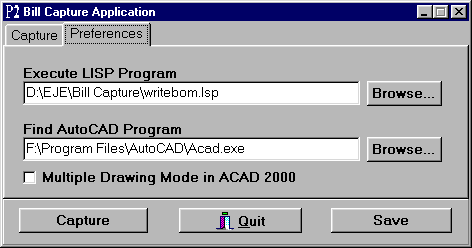
Figure 4 – Capture Application, Preferences Tab
Input Field Descriptions, Preferences Tab
Execute LISP Program
This input field is where you would specify the LISP program to execute during the capture process. It should always be the WriteBOM.Lsp program. This field is used to specify its exact location. Use the Browse button to the right of this field to locate the program file.
Find AutoCAD Program
This input field is used to specify the location of the AutoCAD application file. This is needed when you run the capture application outside of AutoCAD so that it can locate the program and launch it to open the drawings. Use the Browse button to the right of this field to locate the AutoCAD application file.
Multiple Drawing Mode in ACAD 2000
If you are using AutoCAD 2000 or above and you use the Multi-drawing mode to detail, place a check mark in this box so that all the BOM’s will be captured.
Push Button Descriptions
Browse, LISP Program
This button is used to locate LISP program. The window that appears is shown in Figure 5. Use this window to locate the WriteBOM.Lsp program and then click on the OK button to return to the Preferences tab.
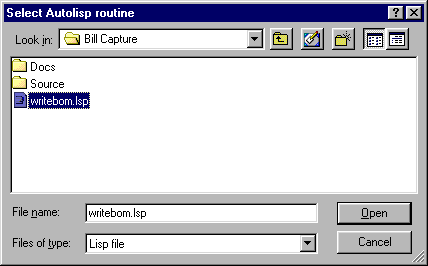
Figure 5 – Preferences Tab, Browse LISP Button
Browse, AutoCAD Application
This button is used to locate AutoCAD application file. The window that appears is shown in Figure 6. Click on the OK button to return to the Preferences tab.
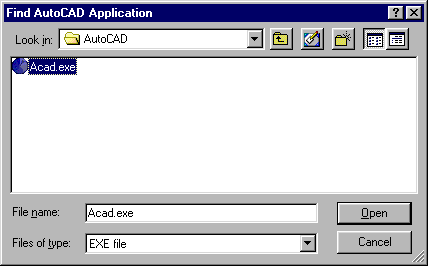
Figure 6 – Preferences Tab, Browse AutoCAD Button
Capture Execution from Within AutoCAD
While in AutoCAD, load the WriteBOM.Lsp application program. You can type one of the following commands at the command prompt to perform the functions described below:
CAPCUR or CAPTURECURRENT – Will prompt you for the layer to capture and then create the ORB file in the same folder as the drawing. The file name will be the same as the drawing but with an ORB extension instead of the typical DWG extension for an AutoCAD drawing.
CAPTURE or ORDBIL – Will launch the Bill of Material Capture Application that is described in this documentation. It is recommended that you not have any of the drawings open that are going to be captured.
